So...it's been a while, but I thought I would toss out an update on the Moleskine Planner/Wallet usage. In short...I'm still using it. I've gone through a few since I started. I will say, the design is a little simpler than I originally started with...only because I am starting to find out what "features" I really use, and which ones I don't. The whole point of switching to the Moleskine as an organization tool was that I didn't want to be limited to what sections/layout/methods that built into a commercial planner. With that said, it doesn't make sense for me to limit myself to my OWN methods if they don't make sense. Right?
Soon, I'll put together a blog entry about what my planner looks like these days. In a nutshell, I am still using a calendar (page a day style) method, but I decided to try something new this latest rendition. In stead of having the entire calendar in one section, I am now trying to keep everything sequential...so calendar section for a week -> notes and journal for that week -> calendar section for the next week -> notes and journal section for that week --> etc. This seems (so far) to be a little more efficient for me, and continues to reduce blank (wasted) pages as I move through time.
Anyway....that's all for now. I've been really REALLY busy lately...so my blog went to the "optional" list. I'm slowly starting to get caught up now, though.
Showing posts with label journal. Show all posts
Showing posts with label journal. Show all posts
Sunday, June 17, 2012
Monday, January 30, 2012
Moleskine :: Planner Wallet Journal Version 2.0
I am now on my second Moleskine since I developed my planner/wallet/journal system. You can find previous write-ups here:
My Moleskine Planner/Journal/Wallet Setup and Hacks
Book Darts! A Follow-up from the cpo Moleskine Customization Method -- And a Review
I made a few small revisions since my original setup, and I thought I would share the evolution with you. I simplified the system a bit, mostly by consolidation.
First off...I still really like the setup. I have carried it daily as a wallet, and really like it. I like having my journal and notes with me at all times. Of course, because I have it handy, I tend to use it...often. This first Moleskine lasted me a little over 3 weeks. I do have a lot going on in my life at the moment, so I may be using it more than I may once things settle down. I'll be satisfied if it gets to about one book per month. The good thing about refreshing books often, is that it forces me to "clean out my wallet". I end up with random stuff like receipts, business cards, and other papers that collect in the back pocket. These things begin to take up more and more space...and its good to thin it out when I change books.
I found that my system provides for very little wasted space. I did have a few blank pages, but not because of my method. Rather, I am very close to filling it up (just a few empty pages left) and I would rather swap now when it is convenient. If I held out, I could maybe get a couple more days, but then I'd have to transition in the middle of a very busy week. Moving to the blank journal was better for me now, even if it costs me a few blank pages.
I jotted some notes on things that I wanted to modify for the next go round. You can see them here:
.JPG)
As you can see, some things are obvious, and others require some explanation.
The first thing I want to mention is that I considered trying another book besides Moleskine. I am a fountain pen user, and there is a little show through...not much...but it's there. You can see a little in the photo above...from the page behind it. I was looking at other books that are known to be more fountain pen friendly, but I ended up back with Moleskine. The Rhodia books have covers that are too thick. The Ecosytem looked good, but I like the grid style, and the grids on the ecosystem were very prominent...dark ink. I liked the more subtle grid of the Moleskine, especially for writing.
I did swap to a soft cover Moleskine, and I think I will like it better. It is the same as the hard cover, only just slightly thinner without the hard cover.
Back to my list...I ditched the pen loop. I didn't need it, and it was just something else hanging off the journal. It was a cool idea, but I found that I rarely stored the pen with the book - likely because I carry it as a wallet.
I originally had a section for work, home, and church. What I found in practical use was that it was sometimes challenging to figure out what sections were best to put what in. My home and church life are intermingled...so it made sense to just make it one section. The other thing was that even sometimes work stuff is "journal-able" but doesn't belong in the "work" section with my other notes. So really, it now has two sections. A personal section for all journaling, and a work section for notes (reference) related to work. I also, of course, have the calendary (daily) and random sections. Here is a photo of the new book, and the old book. You can see how the indexing worked in the old book as I filled it up.
.JPG)
With this new book, I decided to move the to-do sections to the front of each major section. Personal to-do items are in the beginning of the personal section, and work to-do items are in the beginning of the work section.
I put random at the end again, but this time decided to run it backwards...It's just random notes and lists. The moleskine 2.0 list I showed you above is an example of something I put in random.
I also changed my identifiers. Previously, for each page, I put the label at the top, but I found it took up valuable space. I still like looking at the page and being able to tell immediately what section it is, so I switched to using a simple letter identifier at the bottom left corner, on the opposite page of the page numbers. I am using "m" for personal (me) and "w" for business (work). It's essentially a quick squiggle one way or another, which is why I used m and w. It's quick, and takes up little space:
.JPG) Of course, I am going to use "r" for random, and the daily section is a calendar, so it needs no label...but I put "d" in the index anyway.
Of course, I am going to use "r" for random, and the daily section is a calendar, so it needs no label...but I put "d" in the index anyway.
I still totally love the Book Darts. The change I made here was just in my implementation. Instead of putting the dart on the next available page, its 2 pages ahead. That way when I get to writing, I don't find myself writing on the page with the dart...requiring a move in the middle. It was just better for me.
The last thing I did was implement consistency in dating. I still documented the date for each day's entries, but it was random. I decided on a consistent dating delimiter. It just looks like this:
------------------ 1-30 ----------------------
That way when I am looking for something from a specific date, I can look for lines across the page, and identify the date associated with those entries.
So far...I am much happier with this system than I ever was with any pre-printed organizing system. This is 90% journal, 5% task list, and 5% calendar.
My Moleskine Planner/Journal/Wallet Setup and Hacks
Book Darts! A Follow-up from the cpo Moleskine Customization Method -- And a Review
I made a few small revisions since my original setup, and I thought I would share the evolution with you. I simplified the system a bit, mostly by consolidation.
First off...I still really like the setup. I have carried it daily as a wallet, and really like it. I like having my journal and notes with me at all times. Of course, because I have it handy, I tend to use it...often. This first Moleskine lasted me a little over 3 weeks. I do have a lot going on in my life at the moment, so I may be using it more than I may once things settle down. I'll be satisfied if it gets to about one book per month. The good thing about refreshing books often, is that it forces me to "clean out my wallet". I end up with random stuff like receipts, business cards, and other papers that collect in the back pocket. These things begin to take up more and more space...and its good to thin it out when I change books.
I found that my system provides for very little wasted space. I did have a few blank pages, but not because of my method. Rather, I am very close to filling it up (just a few empty pages left) and I would rather swap now when it is convenient. If I held out, I could maybe get a couple more days, but then I'd have to transition in the middle of a very busy week. Moving to the blank journal was better for me now, even if it costs me a few blank pages.
I jotted some notes on things that I wanted to modify for the next go round. You can see them here:
.JPG)
As you can see, some things are obvious, and others require some explanation.
The first thing I want to mention is that I considered trying another book besides Moleskine. I am a fountain pen user, and there is a little show through...not much...but it's there. You can see a little in the photo above...from the page behind it. I was looking at other books that are known to be more fountain pen friendly, but I ended up back with Moleskine. The Rhodia books have covers that are too thick. The Ecosytem looked good, but I like the grid style, and the grids on the ecosystem were very prominent...dark ink. I liked the more subtle grid of the Moleskine, especially for writing.
I did swap to a soft cover Moleskine, and I think I will like it better. It is the same as the hard cover, only just slightly thinner without the hard cover.
Back to my list...I ditched the pen loop. I didn't need it, and it was just something else hanging off the journal. It was a cool idea, but I found that I rarely stored the pen with the book - likely because I carry it as a wallet.
I originally had a section for work, home, and church. What I found in practical use was that it was sometimes challenging to figure out what sections were best to put what in. My home and church life are intermingled...so it made sense to just make it one section. The other thing was that even sometimes work stuff is "journal-able" but doesn't belong in the "work" section with my other notes. So really, it now has two sections. A personal section for all journaling, and a work section for notes (reference) related to work. I also, of course, have the calendary (daily) and random sections. Here is a photo of the new book, and the old book. You can see how the indexing worked in the old book as I filled it up.
.JPG)
With this new book, I decided to move the to-do sections to the front of each major section. Personal to-do items are in the beginning of the personal section, and work to-do items are in the beginning of the work section.
I put random at the end again, but this time decided to run it backwards...It's just random notes and lists. The moleskine 2.0 list I showed you above is an example of something I put in random.
I also changed my identifiers. Previously, for each page, I put the label at the top, but I found it took up valuable space. I still like looking at the page and being able to tell immediately what section it is, so I switched to using a simple letter identifier at the bottom left corner, on the opposite page of the page numbers. I am using "m" for personal (me) and "w" for business (work). It's essentially a quick squiggle one way or another, which is why I used m and w. It's quick, and takes up little space:
.JPG)
I still totally love the Book Darts. The change I made here was just in my implementation. Instead of putting the dart on the next available page, its 2 pages ahead. That way when I get to writing, I don't find myself writing on the page with the dart...requiring a move in the middle. It was just better for me.
The last thing I did was implement consistency in dating. I still documented the date for each day's entries, but it was random. I decided on a consistent dating delimiter. It just looks like this:
------------------ 1-30 ----------------------
That way when I am looking for something from a specific date, I can look for lines across the page, and identify the date associated with those entries.
So far...I am much happier with this system than I ever was with any pre-printed organizing system. This is 90% journal, 5% task list, and 5% calendar.
Wednesday, January 11, 2012
Book Darts! A Follow-up from the cpo Moleskine Customization Method -- And a Review
You might recall from my previous post on how I set up my Moleskine planner/journal/wallet that I was originally planning on using Book Darts for my organization. If you missed that one, or you enjoyed it so much you wanted to read it again, you can find it here. Anyway, I ended up buying some magnetic book marks that were still pretty cool, but I really wanted to try the Book Darts. Well, boys and girls, I found my chance. I found them at a local Denver book store named Tattered Cover, so I picked up a tin of 50. The price wasn't bad at around $8 and no shipping to mess with. I really like Tattered Cover. You can find a photo I took of the Highlands Ranch, Colorado store at:
http://www.chrispoldervaart.com/2012/01/tattered-cover-bookstore-in-highlands.html.
So, you can count this as an amendment to my original post but also as a quick review of the Book Darts.
First. Man. These are awesome! Now that I have them in hand (and in book) I don't know how I was able to settle for the i-clips that I ended up instead. These things are super thin, super light, and hold to the page with a grip that simply amazes me.
As you can see in this photo I originally shared, the i-clips add a little bulk to the Moleskine.
Now, however, take a look at my Pocket Moleskine with the Book Darts!
I lost a little bulk by switching to the book darts, but the end result is still where I want to be. I have a section marker that helps me quickly get to where I want to me. Granted, I did lose the colors, and the thick item to quickly grab, but the Book Darts still make getting around very easy.
So some of you are this point are still confused by what a Book Dart is, exactly. I was unsure too, which is why I am spending a little time giving you some detail and photos. Let's take a look.
To quote essentially what the picture above says:
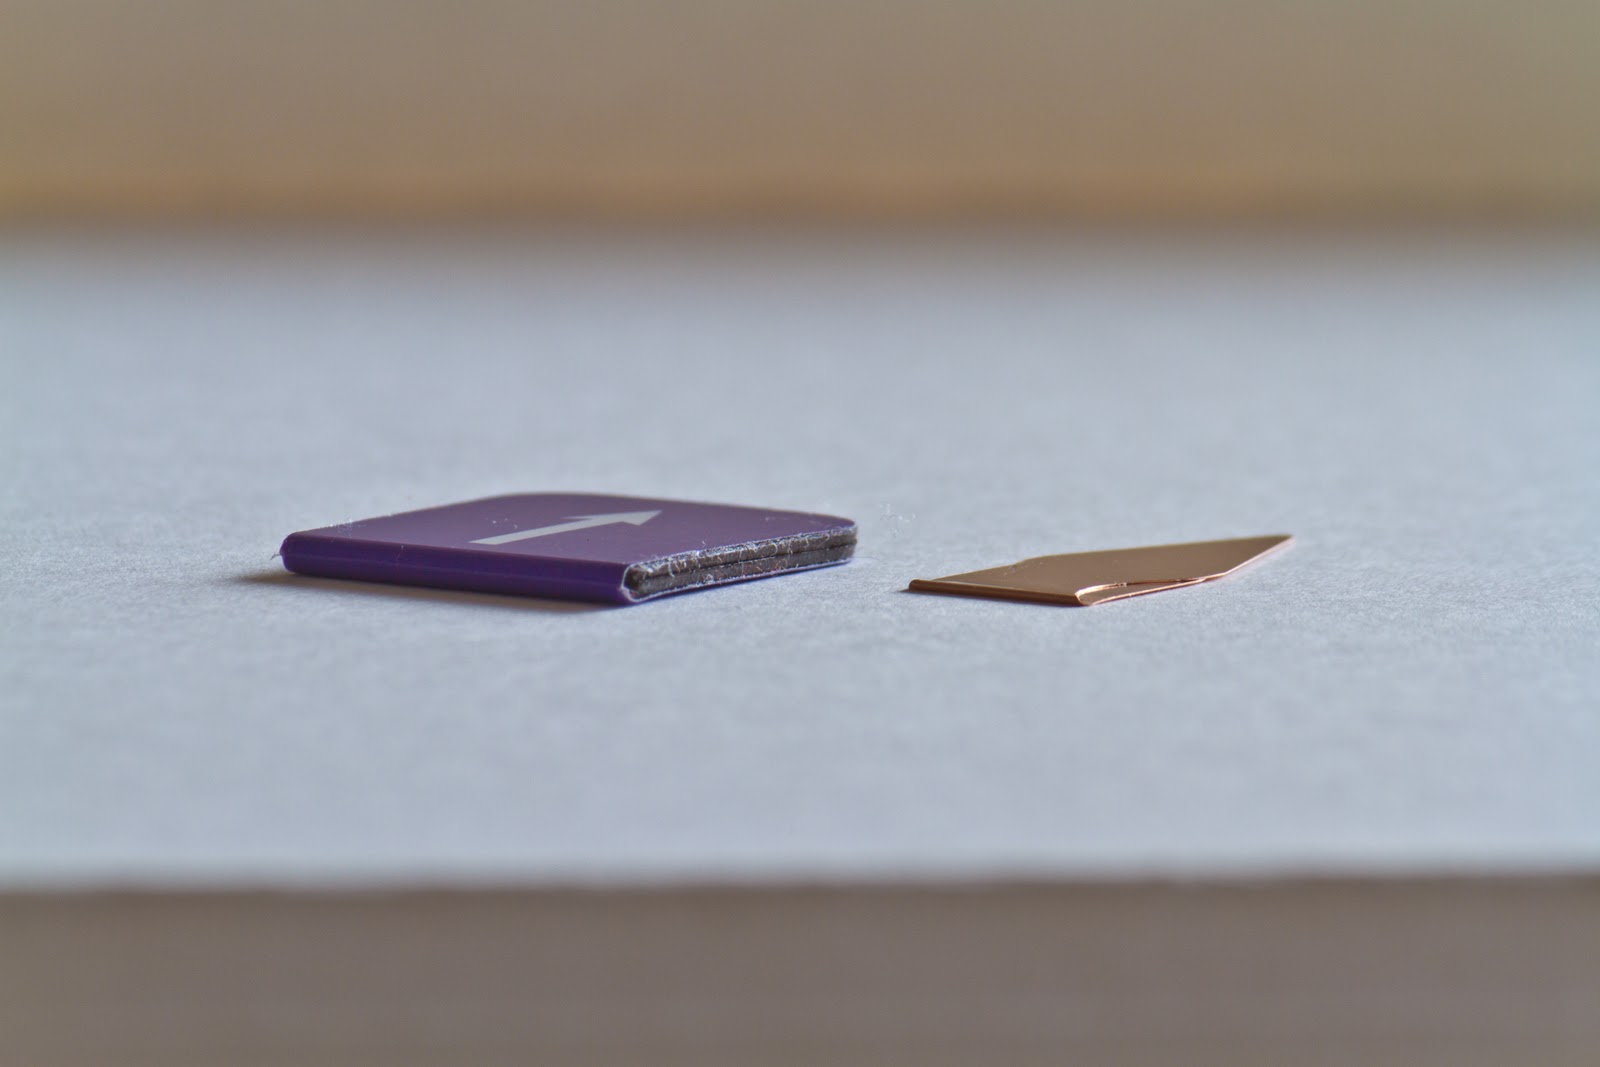
This things are hardly thicker than the paper they clip to! Here is how they compare against the i-clips I was formerly using:
Not only was having a thinner solution better for bulk, there is also the matter of the actual real estate taken on the page. As I mentioned in my other post, I use the marker to point to a writable page for each section. What that means is that I end up writing on that page, and then the marker gets in the way, so I have to move it around. The Book Dart takes up much less room on the page. I am using them upside down (blunt side up rather than the arrow side up) to give me even more room as depicted below.
Here is what the Book Dart was designed to look like (arrow on page you are marking). You can see that it still doesn't take up a lot of room, but the blunt end is almost a non-issue on the page that I am writing on.
While these are a great addition to my Moleskine....I am very excited to use them elsewhere. Heck, I just bought a tin of 50, so I have plenty. I can think of many spots to mark in my Bible already. Even with a typical reading plan, I am in 4 books each day, plus wherever my Pastor happens to be teaching from, plus whatever personal study I am doing, plus wherever I am scribing at the time (you can learn more about that from http://scribingthebible.blogspot.com/). The options are endless.
I am still amazed at the magical combination of small, light, and snug-fitting these Book Darts are. I am very impressed.
And because Book Darts is a sponsor of this blog...
Well... Okay. The truth is that they are not a sponsor. They don't even know I exist. But, I like em anyway. And so will you.
Enjoy!
http://www.chrispoldervaart.com/2012/01/tattered-cover-bookstore-in-highlands.html.
So, you can count this as an amendment to my original post but also as a quick review of the Book Darts.
First. Man. These are awesome! Now that I have them in hand (and in book) I don't know how I was able to settle for the i-clips that I ended up instead. These things are super thin, super light, and hold to the page with a grip that simply amazes me.
As you can see in this photo I originally shared, the i-clips add a little bulk to the Moleskine.
 | |
| i-clips |
Now, however, take a look at my Pocket Moleskine with the Book Darts!
 |
| Can you even see the Book Darts!? |
I lost a little bulk by switching to the book darts, but the end result is still where I want to be. I have a section marker that helps me quickly get to where I want to me. Granted, I did lose the colors, and the thick item to quickly grab, but the Book Darts still make getting around very easy.
So some of you are this point are still confused by what a Book Dart is, exactly. I was unsure too, which is why I am spending a little time giving you some detail and photos. Let's take a look.
 |
| Book Dart tin |
 |
| Bottom of Book Dart tin |
To quote essentially what the picture above says:
Book Darts are a bookmark for exactly where you stopped, and a linemarker for discoveries you want to find easily. They are archivally correct. A safe alternative to paperclips, underlining, and highlighting. Will not stain. Don't let kids eat them, and they are made in the USA.
This things are hardly thicker than the paper they clip to! Here is how they compare against the i-clips I was formerly using:
 |
| Book Dart vs i-clip |
Not only was having a thinner solution better for bulk, there is also the matter of the actual real estate taken on the page. As I mentioned in my other post, I use the marker to point to a writable page for each section. What that means is that I end up writing on that page, and then the marker gets in the way, so I have to move it around. The Book Dart takes up much less room on the page. I am using them upside down (blunt side up rather than the arrow side up) to give me even more room as depicted below.
 |
| Book Dart vs i-clip |
Here is what the Book Dart was designed to look like (arrow on page you are marking). You can see that it still doesn't take up a lot of room, but the blunt end is almost a non-issue on the page that I am writing on.
 |
| Both sides of a Book Dart. |
While these are a great addition to my Moleskine....I am very excited to use them elsewhere. Heck, I just bought a tin of 50, so I have plenty. I can think of many spots to mark in my Bible already. Even with a typical reading plan, I am in 4 books each day, plus wherever my Pastor happens to be teaching from, plus whatever personal study I am doing, plus wherever I am scribing at the time (you can learn more about that from http://scribingthebible.blogspot.com/). The options are endless.
I am still amazed at the magical combination of small, light, and snug-fitting these Book Darts are. I am very impressed.
And because Book Darts is a sponsor of this blog...
Well... Okay. The truth is that they are not a sponsor. They don't even know I exist. But, I like em anyway. And so will you.
Enjoy!
Saturday, January 7, 2012
My Moleskine Planner/Journal/Wallet Setup and Hacks
The cpo Method of Moleskine Organization
 |
| My Everyday Carry Moleskine :: It's my planner. It's my journal. It's my wallet. |
====================
EDIT: I have since updated my tabbing method to use Book Darts instead of the i-clips you see pictured above. EVERYTHING else in this write-up is still valid and in use today. Read this...then go check out why I am using Book Darts instead of i-clips now: http://www.chrispoldervaart.com/2012/01/book-darts-follow-up-from-cpo-moleskine.html. I've got lots of photos for you there too!
====================
EDIT; I am on my second Moleskine notebook, and I have made a few minor revisions to the system after several weeks of use. This post is still very valid, but when you are done with this...make sure you read about Book Darts, and then go see the latest revision: http://www.chrispoldervaart.com/2012/01/moleskine-planner-wallet-journal.html
====================
Much like the rest of the world...the turn of a new year is the time I find myself most concerned with organization, planning, task completion, and fun new projects. In additional to the usual desires to become better organized each year, I also made a resolution to keep a journal. In preparation for this, I went out and picked up a Moleskine-like notebook from a local office supply store (not the one you see here). I started journaling (sp?) with it right away. Also, as usual, I was kicking off the new year with a fresh daily planner. It was about the same size (perhaps a little bigger) than the 5x8 notebook I was carrying around. I won't go into why I prefer manual record keeping even though I also carry an iPhone (personal) and a Blackberry (business). I just prefer it. It works for me.
So anyway...I found myself trying to lug around a daily planner and a journal, along with my usual items such as a wallet, and a couple of mobile devices. I was happy...but I wasn't really happy. I wanted to be MORE happy. After a little research I ended up with a system that I think will work well for me. I saw several Moleskine "hacks" that I really liked, and it gave me some ideas. I combined information from several other blogs and Moleskine-lover websites and built what I think to be the perfect system for me: and it combines the planner and journal features, and also serves as a minimalist wallet. Now when I have my Moleskine, I have everything I need for most situations, including credit and gas card, identification, and insurance and a little cash tucked in the back cover pocket.
|
| Here is a close-up view of the i-clips magnetic page markers and the Leuchtturm1917 Pen Loop. |
So, lets' get on with how I set up my Moleskine. You may set yours up differently, but that's the great thing about this sort of project -- it's as individual as the people toting them around.
My Moleskine of choice was the Pocket sized squared (grid) notebook. I liked the grid paper because I feel free to use it in various ways. It's simple to write sideways or draw or box or whatever.
I glued a few things into my book, as you will see in the pictures below...like a 2012 calendar and my Bible reading plan. A glue stick is the perfect way to accomplish gluing items into your book.
 |
| I glued a year calendar into the front cardboard (on the other side of the owner and reward info page). |
 |
| On the very front inside cover, I glued the current month's Bible reading plan. |
I then numbered my pages...every other one...starting with 1 and labeling all of the odd pages. You can label them all if you want...but it's not necessary. If I can find page 125, I know that 124 is the one right before it. ; ) The key to my organization is to not think of this journal as something I start in the beginning of the book and fill up from left to right until I am out of room. That is how I used to keep a notebook. This is more of a multi-sectioned, yet expandable, concept. I saw lots of discussion about the GTD (Getting Things Done) strategies...and I don't know anything about that...but some of the ideas I implemented in my book came from folks who used a GTD-like system for organization.
The next thing I did was work out what sections I wanted in my book, and how many pages to devote to those sections. It's just a guess for now, but I won't waste space if one section grows faster than another...I'll just expand the growing sections into unused areas of other sections. It's much like the way your computer handles files on your hard drive and organizes where to find them with an index.
My index, labeled @index, is at the very front. Page 0. The very next page is labeled as page 1, and starts my @todo section where I will keep track of actions and tasks. I devoted 7 pages to this section (remember -- it can go beyond 7 at any time, but I had to start somewhere). As you can see in the picture below, I later decided I wanted separate @todo sections for personal items and work items, so I subdivided that section. My work actions start on page 4.
So as you can see, as I was thinking about what I wanted to keep in my book, tasking and actions was one of the items. Here is a breakdown of everything I decided to keep track of:
- @todo
- 7 pages
- tracks actions and things I need to accomplish.
- uses common methods for tracking status in boxes (Covey, GTD, etc)
- @daily
- 16 pages
- this is the calendar to track appointments, by week (photo below)
- it uses two pages per week with a section for each day
- there is a separate section for overflow appointments for any day
- I have allotted 8 weeks for this journal, but not sure how much I will really use
- @work
- 50 pages
- this is for work-related notes and journal entries
- @home
- 50 pages
- this is my personal journal area...for whatever I want
- @church
- 50 pages
- this is for church-related notes, revelations, scriptures, whatever
- @random
- whatever number of pages are left... 10-12
- this is for random items, like lists or other notes that may not fit nicely into another section (jotting down phone numbers or addresses, etc)
 |
| The first real text I have is the index which tells me where each section is found. The I start the @todo section. |
 |
| I use the two-page per week calendar hack to track appointments for the week. |
After I got the Moleskine organized the way I wanted, I considered how I wanted to mark the sections. I saw lots of people who use sticky notes or other paper markers...and that is certainly the cheap and easy route. I originally thought I might like to use Book Darts and I set out to find some of those. I didn't find any, but while I was at Barnes&Nobles looking for them, I ran across i-clips. [Remember, I found Book Darts and am now using them: http://www.chrispoldervaart.com/2012/01/book-darts-follow-up-from-cpo-moleskine.html] These are little magnetic paper markers. They basically clip around a page magnetically. They are easy to move around, and because they have a little heft to them, they provide good tactile feedback when trying to find a section. They do take up a little space, however, and add slightly to the thickness of the book. Go back up to the second image from the top of this page, and you will see what I mean.
The i-clips I bought were the "Punctuation" version. I really didn't care what was on them, as long as they weren't too ugly. ; ) The good news is that while one side of these has punctuation marks (in the form of ? @ & and !) the other side has an arrow. That's pretty cool. Like I said though, I am not concerned with what is on them, because I use the color and location to find where i want to go. I know the order of my sections, so from the top down, I can hit the major sections of @work, @home, @church, and @random pretty quickly.
So far, I like them. I will still check out Book Darts if I happen to run across them, though.
 |
| As you can see, I use the page markers to quickly find the writable space for any section. |
I built my card holder from instructions I found here:
http://www.moleskinerie.com/2010/03/the-mowallet.html
It was pretty simple. I just used a thick card-stock type photo envelope I found laying around in my office. Easy peasy lemon squeezy.
 |
| On the very back cardboard sheet, I glued a makeshift credit card and driver's license holder. You can also see the pen loop. |
The last thing I wanted to share with you was the pen loop I found. It was a total impulse buy from The Container Store...but I thought I would give it a try. It's works nicely, and is pretty simple. There are tons of "hack" instructions to do something similar with tape. I just happened across this and bought it. The elastic is good and tight. In fact, it was a little challenging at first to use with my LAMY Safari Fountain Pen, which happens to be my writing utensil of choice. The LAMY is very thick and squared...so it doesn't slip easily into the elastic as a normal pen with a pointed section might. In fact, after I bought it, I thought I wasted my money. But...in just a few days, the elastic is starting to loosen up a bit, and I found an easy way to get the pen in there (stretching the elastic by pulling on it as I fit the end of the pen into it). It's getting easier, so I may keep it around a bit.
A couple of thoughts on placement. I didn't just stick it in the middle of the Moleskine, but rather lined the pen up and placed it on the pen to figure out where I wanted to put it. If I just put it in the middle, the pen cap might be in the way of getting the pen even with the top and bottom of the Moleskine. I didn't measure, but it looks like the Pen Loop may be just a smidge below the center line on the back cover. Not much though. But when I slide the pen in, and slip it all the way to where the cap touches the loop, the pen is perfectly centered.
Given all of the trouble I had getting the pen in and out at first, I was almost wondering if it might not have been smarter to put the pen loop higher up the cover...so that the loop would go around the cap rather than the barrel of the pen. That way I could just leave the cap connected to the book, and pull the pen out of the cap to use. I'm still considering that...but as I use it, the loop is breaking in nicely.
 |
| These were the items I bought (impulse buys!) i-clips from Barnes & Noble and the Pen Loop from The Container Store. |
So that's pretty much it. Oh! Wait! I need to tell you how I plan to make sure that I don't waste space if one section fills up before the other. Metadata and indexing. Like I mentioned earlier, it's a lot like how your computer keeps track of data on a hard drive.
Let's say I fill up the personal @todo section right away. That's pretty realistic, since it's only 3 pages. One option would be to find the next spot in the journal that has a few contiguous empty pages. I wouldn't want to do it at the work section of @todo, because there isn't much room there to begin with. It's likely that I'll find it somewhere in the @work section.
I'll just allocate a few more pages (4 perhaps) in the middle of the @work section for more @todo items. I'll note the page numbers that I allocated and then add that to the @index.
The new @index for @todo might look like this:
- @todo (personal) 1-3, 40-43
- @todo (work) 4-7
I'll also add some metadata within the section to let me know where to go next, by putting something like "--> 40" at the end of page 3. If I am reading through the list, I'll know it continues on page 40. At the beginning of page 40, I'll put "<-- 3" to let me know that this is a continuation of page 3 information. See? Simple really.
Now what do I do if my @work journal reaches the end of page 39 now that 40 is used for the @todo list? Same thing. I know that 44 is blank (since I only allocated pages 40-43 for the @todo continuation) so I will use "--> 44" at the end of page 39, and "<--39" at the beginning of page 44. I'll update the @index to reflect the changes, at it's back to business. I essentially just skip the few pages that has something else on it, and keep going.
- @work 24-39, 44-
Additionally, I plan to use metadata for journal entries whenever it makes sense. Just like I continue pages, I may point a specific entry to another page that has a related entry...if I am continuing the thought. Time will tell how much I use that "feature".
Oh, and the back pocket...a few things like my insurance card, receipts I need, a little cash, etc.
Well, I hope you found something useful in here. I probably gave this much more thought than anyone should give to using a pocket-sized notebook, but that's how I roll. ; )
Please let me know if you have any questions or need clarification on anything. Enjoy!
Manufacturer links to the products described on this page:
Moleskine Pocket Squared Notebook
LAMY Safari Fountain Pen
i-clips Magnetic Page Markers
Leuchtturm1917 Pen Loop
Much of the information I used to develop my system came from some of the following references (that I could remember, anyway). Either way, if you are interested in such a things...there is tons of great reading here.
http://freelanceswitch.com/productivity/the-monster-collection-of-moleskine-tips-tricks-and-hacks/?utm_source=feedburner
http://www.moleskinerie.com/
http://www.moleskine.com/mymoleskine/community/mymoleskine_hacks.php http://www.43folders.com/2004/11/18/more-moleskine-hacks
http://www.organizeit.co.uk/2009/04/25/definitive-collection-of-moleskine-hacks-tips-and-resources/
http://www.lifehack.org/articles/productivity/10-great-moleskine-hacks.html
http://www.treehugger.com/clean-technology/6-awesome-moleskine-hacks.html
http://pigpog.com/2007/04/26/moleskine-hacks/
http://www.mikeshea.net/Mikes_Moleskine_Hacks.html
Subscribe to:
Posts (Atom)